Tutorial: Guide to setup up Push Notifications on iOS and OSX
Push notifications is used to integrate real-time messaging to your apps. It keeps you stay in touch with users and makes it easy for your users to communicate. Below are the necessary steps required to add this feature to your application.
You need an iOS device and Apple Developer account to test push notifications and wont work on Simulators.
1. Creating the SSL certificate
SSL certificate will help server to allow push notification and the app is identified using App ID
1.1. How to Create an Explicit App ID
To install an app in iOS Device App ID is mandatory. These App IDs are in reversed addresses format (ex. com.pushnotif.sample).
To support APNS app must use an Explicit App ID.
Is it possible to use my existing App ID?
If you have an App ID for your app and make sure that it was set up as an Explicit App ID. Wildcard App IDs cannot support APNS. You cannot convert Wildcard App IDs to Explicit App IDs
The following instructions cover the creation of a new Explicit App ID. If you have one goto Step 1.2
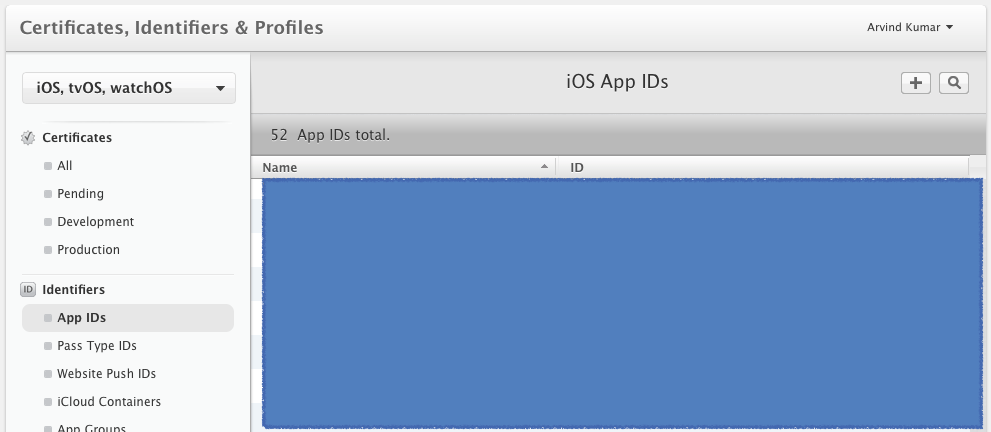
- Go to Apple Developer Member Center and click on Certificates, Identifiers & Profiles.
- Click Identifiers under the proper section (iOS Apps or Mac Apps).
- It will list all your App IDs. Click the + button to register a new App Id.
- Under App ID Description give a name for your new App ID.
- Choose an App ID Prefix and the default selection will be correct in most cases.
- Under App ID Suffix, select Explicit App ID and enter your iOS app’s Bundle ID. This Bundle ID should match the Bundle Identifier in your Project's Info.plist file.
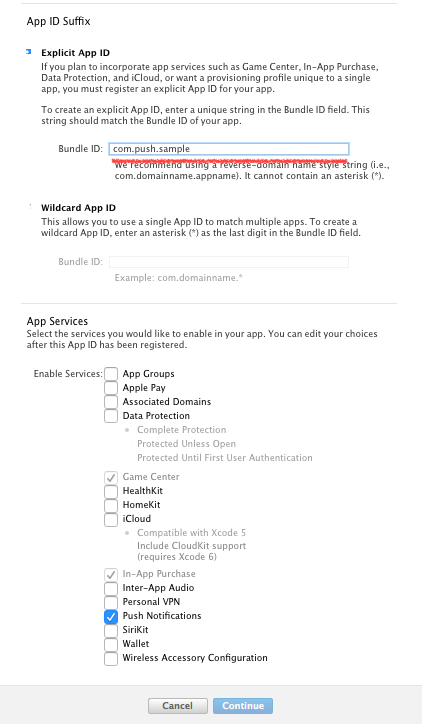
- Under App Services Enable Push Notifications. Optionally you can enable any other services that your app needs.
- Select “Continue” now Push Notifications should be enabled for the App ID and the Identifier field should match your app’s Bundle Identifier (plus App ID Prefix). Select “Submit” to complete the registration of your new App ID.
1.2. How to configure your App ID for Push Notifications
You’ve created a new App ID, follow below steps to configure the App ID for Push Notifications.
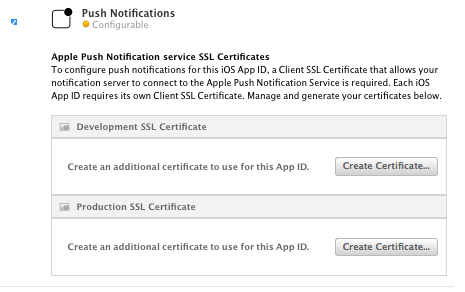
- Select your newly created App ID from the list of App IDs and then select “Edit”.
- Go to the Push Notifications section at bottom. Here you will be able to create both a Development SSL Certificate, as well as a Production SSL Certificate. Start by selecting “Create Certificate” under “Development SSL Certificate”.
- Follow the instructions in the next screen to create a Certificate Signing Request (CSR, to authenticate the creation of the SSL certificate) using the Keychain Access utility on your Mac.
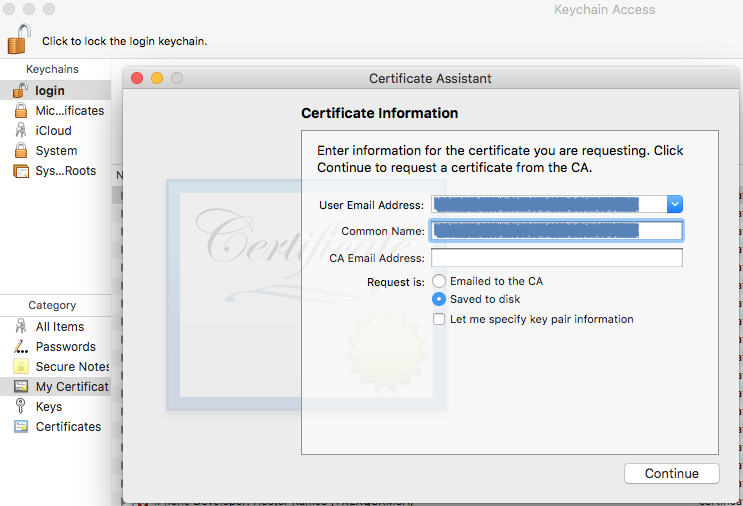
- Upload the CSR to Apple’s servers, then select “Generate”. Your certificate will be created and ready for download. Download the newly created SSL certificate.
- On your mac double click on the downloaded certificate it will be automatically added to your login Keychain.

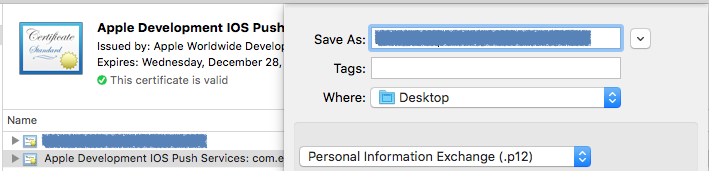
- Open the Keychain Access utility, and locate the certificate you just added under “My Certificates”. It should be called “Apple Development
<platform> Push Services: <YourBundleIdentifier>” if it is a development certificate, or “Apple Push Services: <YourBundleIdentifier> ” if it is a production certificate.
-
Right-click on the certificate, select “Export”, and save it as a .p12 file. A password prompt will be show, which will be used to protect the exported certificate. Do not enter an export password when prompted! and click OK. You will then be asked to enter your Mac password to allow Keychain Access to export the certificate from your keychain. Enter password and click on Allow.
Check whether the Personal Information Exchange (.p12) option is greyed out, check whether the “My Certificates” is selected in Keychain Access. You can double check that your certificate appears under the login keychain. You can drag and drop it into login and verify.
Voila, you have just enabled Push Notification for your app in development mode. Before releasing your application on the App Store, you will need to repeat steps 1 through 7 of this section, but with “Production Push SSL Certificate” in step 2 instead. You can reuse the CSR from step 3.
2. How to create the Development Provisioning Profile
Provisioning Profile is used authenticate your device to run the app. If you modify or create new App ID, you have to recreate your provisioning profile and install it. If you have any trouble using provisioning profile, try removing the App ID and redo above steps again.
Always test your app Push Notification in production before submitting to App Store. Check Section 5.
- Go to Apple Developer Member Center and click Certificates, Identifiers & Profiles.
- Click Provisioning Profiles under proper section (iOS Apps or Mac Apps)
- It will list all your Provisioning profiles. Select the + button to create a new Provisioning Profile.
- Select “iOS App Development” (or “Mac App Development”) as your provisioning profile type then click “Continue”.
- Select the App ID you created in Section 1 from the drop down then click “Continue”.
- Make sure to select your Development certificate in the next screen, then click “Continue”. If you do not have one create a new “iOS App Development” (or “Mac App Development”) certificate.
- Select the devices listed “Continue” Only these devices can be used to test push notifications during development.
- Select a name for this provisioning profile, like “Tutorial APNS App Development Profile”, then click “Generate”.
- Download the generated provisioning profile from the next screen by clicking the “Download” button.
- Add the profile to Xcode by double-clicking on the downloaded file.
3. How to configure a Push Enabled Application
Goto Xcode application’s project settings. Make sure that the App ID and the provisioning profile are properly configured.
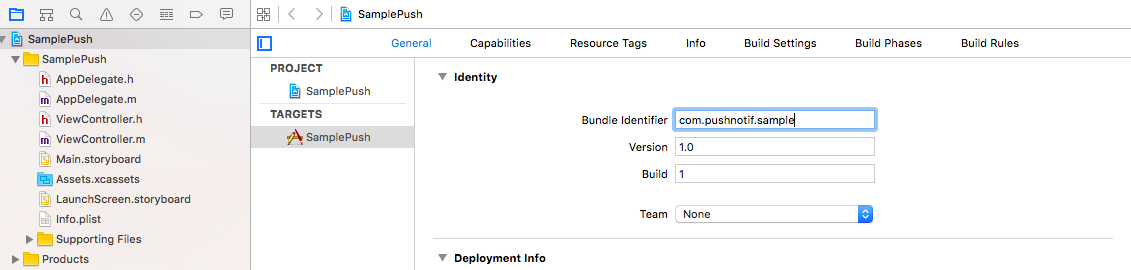
- Select your project in the Project navigator, then select your application target in the main Editor window. Check “General” is selected at the top.
- Change the Bundle Identifier under Identity to match your App ID’s Bundle Identifier in General Tab (ex. com.pushnotif.sample).
- Select “Capabilities”, tab then turn on Push Notifications. Xcode will let you know if there are any issues that require your action.
- Select “Build Settings”, and search for the “Code Signing Identity”. This field should be set to “iOS Developer” for development, or “iOS Distribution” for testing in production or building your app for the App Store.
4. How to Add Code for a Push Enabled Application
Below are the required codes to make push notification working.
To register a device for push, call UIApplication's registerForRemoteNotifications method from the app delegate’s application:didFinishLaunchingWithOptions: in AppDelegate.
// Objective-C
- (BOOL)application:(UIApplication *)application didFinishLaunchingWithOptions:(NSDictionary *)launchOptions {
...

UIUserNotificationType userNotificationTypes = (UIUserNotificationTypeAlert |
                                            UIUserNotificationTypeBadge |
                                            UIUserNotificationTypeSound);
UIUserNotificationSettings *settings = [UIUserNotificationSettings settingsForTypes:userNotificationTypes
                                                                    categories:nil];
[application registerUserNotificationSettings:settings];
[application registerForRemoteNotifications];
...
}
// Swift
func application(application: UIApplication, didFinishLaunchingWithOptions launchOptions: [NSObject: AnyObject]?) -> Bool
{
...
let userNotificationTypes: UIUserNotificationType = [.Alert, .Badge, .Sound]
let settings = UIUserNotificationSettings(forTypes: userNotificationTypes, categories: nil)
application.registerUserNotificationSettings(settings)
application.registerForRemoteNotifications()
...
}
If the device is registered, the callback method application:didRegisterForRemoteNotificationsWithDeviceToken: in the application delegate will be executed. We need to use this method to inform server about the new device.
// Objective-C
- (void)application:(UIApplication *)application didRegisterForRemoteNotificationsWithDeviceToken:(NSData *)deviceToken {
// Store the deviceToken in the current installation and save it to server.

}
// Swift
func application(application: UIApplication, didRegisterForRemoteNotificationsWithDeviceToken deviceToken: NSData) {

}
Run your application to check everything is set up. First time you run this app on iOS you should see an alert requesting permission from the user to send push notifications. iOS Simulator cannot receive push notifications, always test on actual device for iOS.
5. How to Prepare for the App Store
Configure your app to use a Distribution provisioning profile. This is almost same as that of an app that has been downloaded from the App Store and easy for you test the live scenario.
- In Section 1.2., you configured your App ID for Push Notifications in Development. Redo steps 1 through 7, but select “Production Push SSL Certificate” in step 2.
- Your App ID should now be configured for both Development and Distribution push notifications. Download the new Production SSL Certificate from the App ID Settings screen.
- Double click to install the downloaded SSL certificate it in your keychain. Right-click on it and export it as a .p12 file. Don’t enter an export password when prompted.
- Go back to Section 2 and redo steps 1 through 10, select “Ad Hoc” under Distribution in Step 4. You should also use a different name in Step 8, such as “Tutorial APNS App Ad Hoc Profile”.
- Upload your exported Production .p12 certificate to server.
- In Section 3, you configured your app to use a Development provisioning profile. Redo your steps, but choose your new Distribution Ad Hoc provisioning profile.
- Take a break! Go through section 4 again.
- Build and run your app on an iOS device (if targeting iOS). Test whether push notifications are delivered successfully.
5.2. How to Configure your App for App Store Distribution
You have now tested your app to receive distribution push notifications using an Ad Hoc provisioning profile. Next step is to submit your app to the App Store.
- Follow steps 1 through 10 from Section 2, select “App Store” under Distribution for Step 4. Skip Step 7 no need to select test devices.
- Go through Section 3 again, this time selecting your new App Store Distribution provisioning profile.
- Break! Skip section 4.
- Build and archive your app, then submit to the App Store using Xcode Organiser or Application Loader.
 In
In  By
By